DBA Hub

📋Steps in this guide1/34

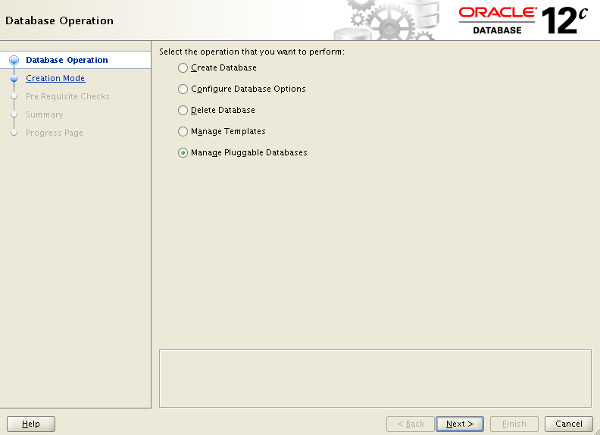
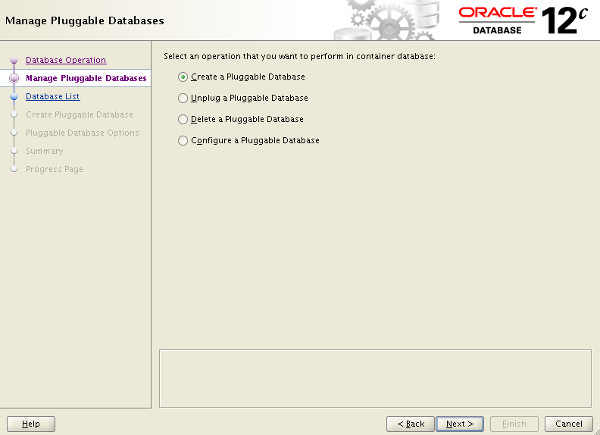
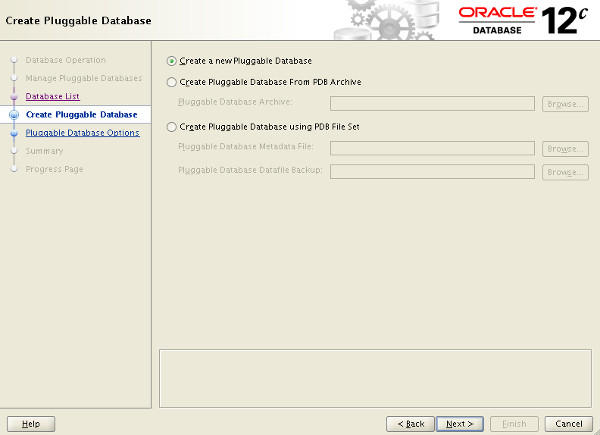
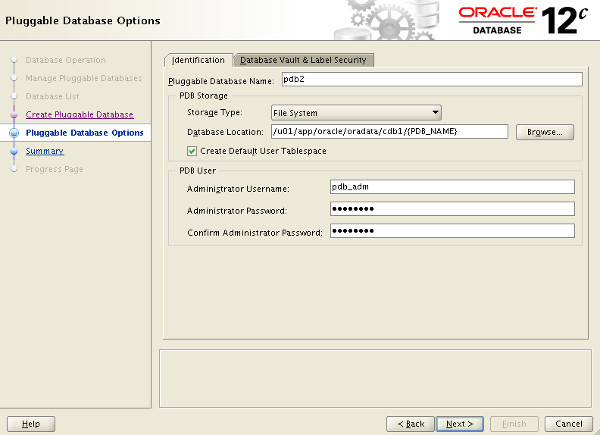
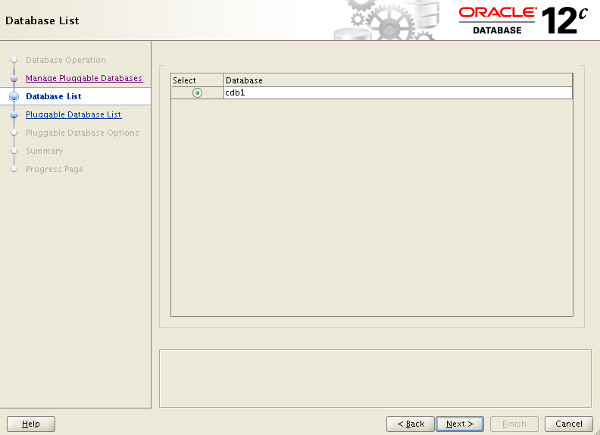
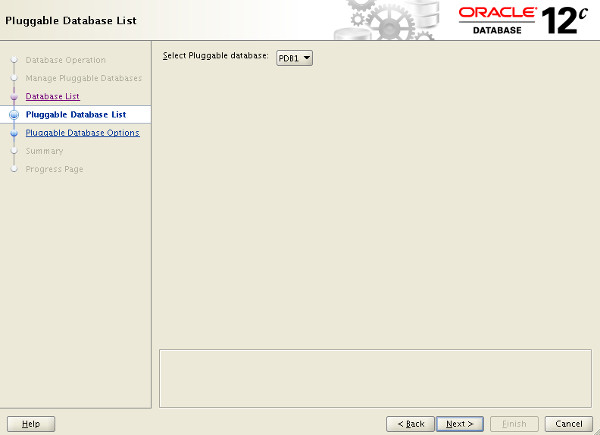
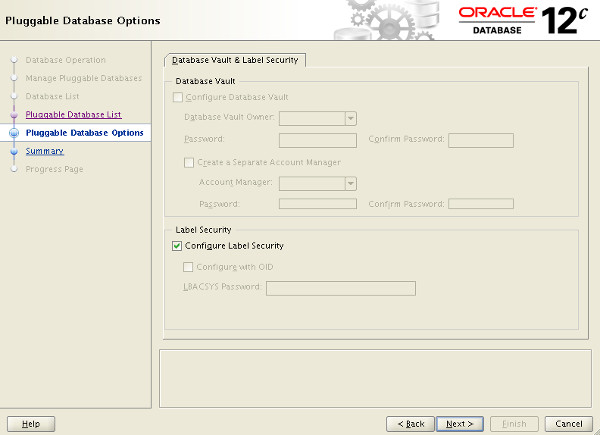
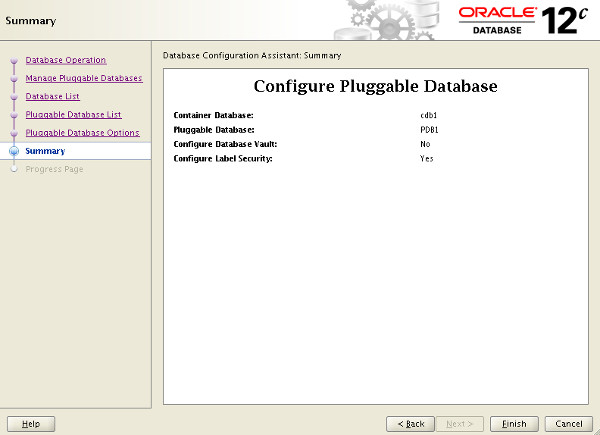
Multitenant : Create and Configure a Pluggable Database (PDB) in Oracle Database 12c Release 1 (12.1)

Take your next steps with the Oracle Database 12c Multitenant option by creating pluggable databases.

oracle 12cconfigurationintermediate
by OracleDba
17 views
1

Database Configuration Assistant (DBCA)

The multitenant option introduced in Oracle Database 12c allows a single container database (CDB) to host multiple separate pluggable databases (PDB). This article covers the options available to create a new pluggable database in an existing container database. This article was written for Oracle 12.1, but content is still relevant for Oracle 12.2. Adjustments have been made where necessary. There are articles specifically about installation of Oracle Database 12c here . - Oracle Universal Installer (OUI) - Database Configuration Assistant (DBCA) Create a Pluggable Database (PDB) using the DBCA Unplug a Pluggable Database (PDB) using the DBCA Plugin a Pluggable Database (PDB) using the DBCA Delete a Pluggable Database (PDB) using the DBCA Configure a Pluggable Database (PDB) using the DBCA - Create a Pluggable Database (PDB) using the DBCA - Unplug a Pluggable Database (PDB) using the DBCA - Plugin a Pluggable Database (PDB) using the DBCA - Delete a Pluggable Database (PDB) using the DBCA - Configure a Pluggable Database (PDB) using the DBCA - Manual (SQL*Plus) Create a Pluggable Database (PDB) Manually Unplug a Pluggable Database (PDB) Manually Plugin a Pluggable Database (PDB) Manually Clone a Pluggable Database (PDB) Manually Clone a Pluggable Database (PDB) Manually (Metadata-Only : NO DATA) Delete a Pluggable Database (PDB) Manually - Create a Pluggable Database (PDB) Manually - Unplug a Pluggable Database (PDB) Manually - Plugin a Pluggable Database (PDB) Manually - Clone a Pluggable Database (PDB) Manually - Clone a Pluggable Database (PDB) Manually (Metadata-Only : NO DATA) - Delete a Pluggable Database (PDB) Manually - SQL Developer - Cloud Control - Create a Pluggable Database (PDB) using the DBCA - Unplug a Pluggable Database (PDB) using the DBCA - Plugin a Pluggable Database (PDB) using the DBCA - Delete a Pluggable Database (PDB) using the DBCA - Configure a Pluggable Database (PDB) using the DBCA - Create a Pluggable Database (PDB) Manually - Unplug a Pluggable Database (PDB) Manually - Plugin a Pluggable Database (PDB) Manually - Clone a Pluggable Database (PDB) Manually - Clone a Pluggable Database (PDB) Manually (Metadata-Only : NO DATA) - Delete a Pluggable Database (PDB) Manually Related articles. In a previous article we discussed the creation of a pluggable database (PDB) during the creation of the container database (CDB) during the installation of the Oracle software using the Oracle Universal Installer (OUI). This topic will not be repeated here, so please refer to the Container Database article for more information. In a previous article we discussed the creation of a pluggable database (PDB) during the creation of the container database (CDB) using the Database Configuration Assistant (DBCA). This topic will not be repeated here, so please refer to the Container Database article for more information. The DBCA includes a new option on the opening "Database Operation" screen that allows you to manage the pluggable databases of an existing container database. Select the "Manage Pluggable Databases" option and click the "Next" button. You can see from the resulting screen what operations are possible with pluggable databases.
Step 1
2

Create a Pluggable Database (PDB) using the DBCA

The following sections describe some of these options. The screens look a little different between Oracle 12.1 and 12.2, but not enough to cause any confusion. On the "Manage Pluggable Databases" screen shown previously, select the "Create a Pluggable Database" option and click the "Next" button. On the resulting screen, select the container database to house the new pluggable database and click the "Next" button.
Step 2
3

Create a Pluggable Database (PDB) using the DBCA

Select the "Create a new Pluggable Database" option and click the "Next" button. If you were plugging in a previously unplugged database, you would select the PDB Archive or PDB File Set options to match the format of the files containing the unplugged PDB.
Step 3
4

Create a Pluggable Database (PDB) using the DBCA

Enter the pluggable database name, database location and admin credentials, then click the "Next" button.
Step 4
5

Create a Pluggable Database (PDB) using the DBCA

If you are happy with the summary information, click the "Finish" button.
Step 5
6

Create a Pluggable Database (PDB) using the DBCA

Wait while the pluggable database is created. Once complete, click the "OK" button on the message dialog and the "Close" button on the main screen.
Step 6
7

Unplug a Pluggable Database (PDB) using the DBCA

The new pluggable database has been created as a clone of the seed database. On the "Manage Pluggable Databases" screen shown previously, select the "Unplug a Pluggable Database" option and click the "Next" button. On the resulting screen, select the container database that houses the pluggable database to be unplugged and click the "Next" button.
Step 7
8

Unplug a Pluggable Database (PDB) using the DBCA

Select the PDB to unplug, decide whether to use a pluggable database archive or a file set and enter the appropriate location details. Click the "Next" button.
Step 8
9

Unplug a Pluggable Database (PDB) using the DBCA

If you are happy with the summary information, click the "Finish" button.
Step 9
10

Unplug a Pluggable Database (PDB) using the DBCA

Wait while the pluggable database is unplugged. Once complete, click the "OK" button on the message dialog and the "Close" button on the main screen.
Step 10
11

Plugin a Pluggable Database (PDB) using the DBCA

The pluggable database has now been unplugged. On the "Manage Pluggable Databases" screen shown previously, select the "Create a Pluggable Database" option and click the "Next" button. On the resulting screen, select the container database to house the new pluggable database and click the "Next" button.
Step 11
12

Plugin a Pluggable Database (PDB) using the DBCA

Select the "Create Pluggable Database From PDB Archive" or "Create Pluggable Database using PDB File Set" option and enter the location of the required files. You can browse for the files using the "Browse" button.
Step 12
13

Plugin a Pluggable Database (PDB) using the DBCA

Enter the pluggable database name, database location and admin credentials, then click the "Next" button.
Step 13
14

Plugin a Pluggable Database (PDB) using the DBCA

If you are happy with the summary information, click the "Finish" button.
Step 14
15

Plugin a Pluggable Database (PDB) using the DBCA

Wait while the pluggable database is created. Once complete, click the "OK" button on the message dialog and the "Close" button on the main screen.
Step 15
16

Delete a Pluggable Database (PDB) using the DBCA

The pluggable database has been plugged into the container database. On the "Manage Pluggable Databases" screen shown previously, select the "Delete a Pluggable Database" option and click the "Next" button. On the resulting screen, select the container database that houses the pluggable database to be deleted and click the "Next" button.
Step 16
17

Delete a Pluggable Database (PDB) using the DBCA

Select the PDB to delete and click the "Next" button.
Step 17
18

Delete a Pluggable Database (PDB) using the DBCA

If you are happy with the summary information, click the "Finish" button.
Step 18
19

Delete a Pluggable Database (PDB) using the DBCA

Wait while the pluggable database is deleted. Once complete, click the "OK" button on the message dialog and the "Close" button on the main screen.
Step 19
20

Configure a Pluggable Database (PDB) using the DBCA

The pluggable database has been deleted from the container database. On the "Manage Pluggable Databases" screen shown previously, select the "Configure a Pluggable Database" option and click the "Next" button. On the resulting screen, select the container database that houses the pluggable database to be configured and click the "Next" button.
Step 20
21

Configure a Pluggable Database (PDB) using the DBCA

Select the PDB to configure and click the "Next" button.
Step 21
22

Configure a Pluggable Database (PDB) using the DBCA

Select any additional options you would like to configure, then click the "Next" button.
Step 22
23

Configure a Pluggable Database (PDB) using the DBCA

If you are happy with the summary information, click the "Finish" button.
Step 23
24

Configure a Pluggable Database (PDB) using the DBCA

Wait while the pluggable database is configured. Once complete, click the "OK" button on the message dialog and the "Close" button on the main screen.
Step 24
25

Create a Pluggable Database (PDB) Manually

The pluggable database has been configured. There are lots of variations on the CREATE PLUGGABLE DATABASE and ALTER PLUGGABLE DATABASE commands, so we will keep things simple here and only focus on those that mimic what is possible in the DBCA. For all the operations listed here you must be connected to the CDB with the container set to root (the default). Typically you will be connected to a common user with SYSDBA or SYSOPER privilege. When creating a new pluggable database, the user must have the system privilege. To create a new pluggable database from the seed database, all we have to do is tell Oracle where the file should be placed.
Step 25
26

Unplug a Pluggable Database (PDB) Manually

We can do this using one of three methods. If we are using Oracle Managed Files (OMF) we don't need to worry about the file placement. Oracle will handle it for us. From 12.1.0.2 onward there is an inline variation of this using the clause. The path set in this clause will be used as the OMF location for the new PDB. The second method uses the clause in the statement. Alternatively, we can specify the initialization parameter before calling the command without using the clause. Every time there is a need to convert file locations, either of these two methods will work. For the remainder of the article I will stick to using the method to cut down on the variations I have to display. We can see the PDBs are present by querying the and views. You can also use the command from SQL*Plus. The PDBs are created with the status of 'NEW'. They must be opened in mode at least once for the integration of the PDB into the CDB to be complete. Depending on the syntax used, you may need to grant the PDB_DBA role to the local admin users for the PDB. There is an update to this functionality in Oracle 12.2, described here .
Step 26
27

Plugin a Pluggable Database (PDB) Manually

Before attempting to unplug a PDB, you must make sure it is closed. To unplug the database use the command with the clause to specify the location of the XML metadata file. The pluggable database is still present, but you shouldn't open it until the metadata file and all the datafiles are copied somewhere safe. You can delete the PDB, choosing to keep the files on the file system. There is an update to this functionality in Oracle 12.2, described here .
Step 27
28

Clone a Pluggable Database (PDB) Manually

Plugging in a PDB into the CDB is similar to creating a new PDB. First check the PBD is compatible with the CDB by calling the function, passing in the XML metadata file and the name of the PDB you want to create using it. If the PDB is not compatible, violations are listed in the view. If the PDB is compatible, create a new PDB using it as the source. If we were creating it with a new name we might do something like this. Instead, we want to plug the database back into the same container, so we don't need to copy the files or recreate the temp file, so we can do the following. Cloning an existing local PDB is similar to creating a new PDB from the seed PDB, except now we are using non-seed PDB as the source, which we have to identify using the clause.
Step 28
29

SQL Developer

If you are using 12.1, or 12.2 without local undo mode, make sure the source PDB is open in mode. The cloning syntax also allows for cloning from remote databases using a database link in the local CBD. There are a few restriction associated with this functionality. This functionality does not work properly in the 12.1.0.1 release of the database, but it has been fixed in 12.1.0.2. You can see some articles specifically on this subject. The 12.1.0.2 patchset introduced the ability to do a metadata-only clone. Adding the clause when cloning a PDB signifies that only the metadata for the user-created objects should be cloned, not the data in the tables and indexes. You can read more about this feature in the following article. When dropping a pluggable database, you must decide whether to keep or drop the associated datafiles. The PDBs must be closed before being dropped. The DBA section of SQL Developer includes tree node called "Container Database".
Step 29
30

SQL Developer

Right-clicking on the "Container Database" node produces a popup menu showing you what operations are available.
Step 30
31

SQL Developer

Right-clicking on a specific PDB node produces a popup menu showing only those operations that are relevant to that PDB.
Step 31
32

Cloud Control

If you understand the DBCA and SQL*Plus approach to managing PDBs, these SQL Developer screens are very straight forward. Cloud Control 12cR3 onward supports pluggable database functionality. Once you click on the container database, the "Oracle Database > Control > Open/Close Pluggable Database" menu option allows you to control the state of the PDBs owned by the CDB.
Step 32
33

Cloud Control

The "Oracle Database > Provision > Provision Pluggable Database" menu option allows you to perform other operations PDBs owned by the CDB, including cloning, unplugging amongst other things.
Step 33
34

Cloud Control

As with SQL Developer, if you understand how the pluggable database functionality works, the Cloud Control screens are self explanatory. For more information see: Hope this helps. Regards Tim...
Step 34

Comments (0)

Please to add comments

No comments yet. Be the first to comment!