DBA Hub

📋Steps in this guide1/21

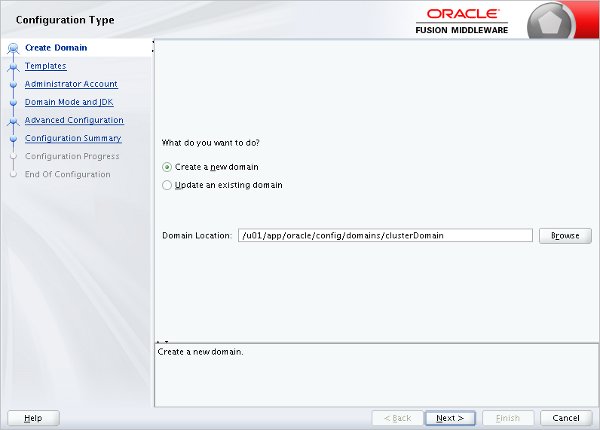
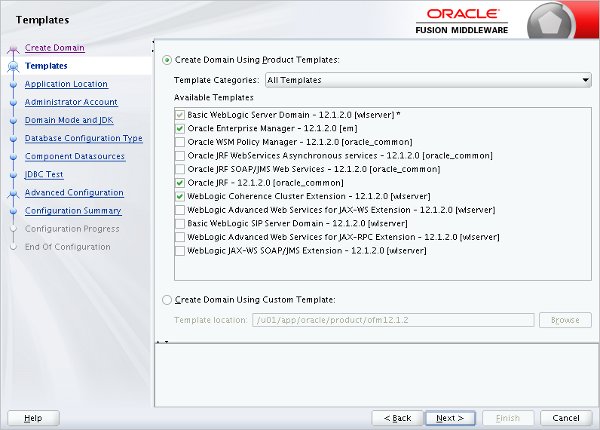
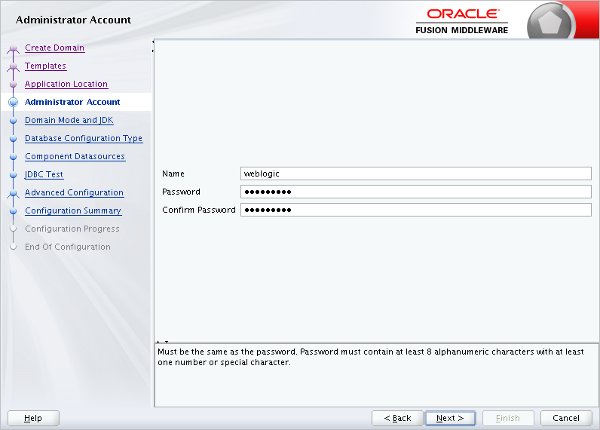
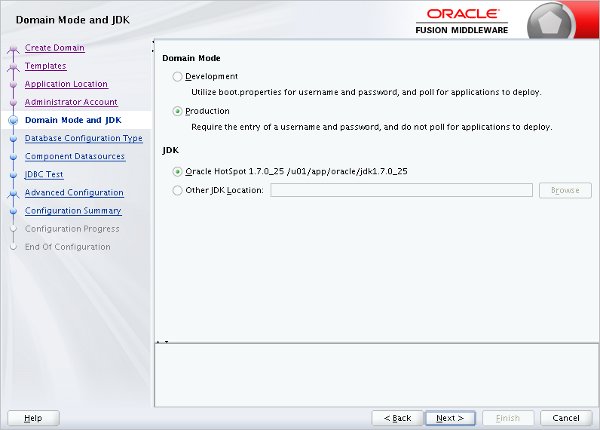
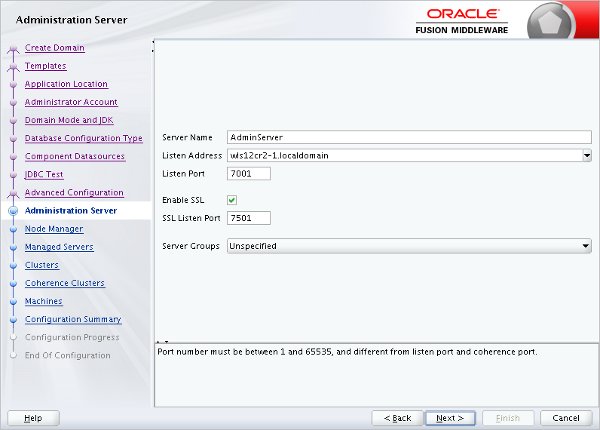
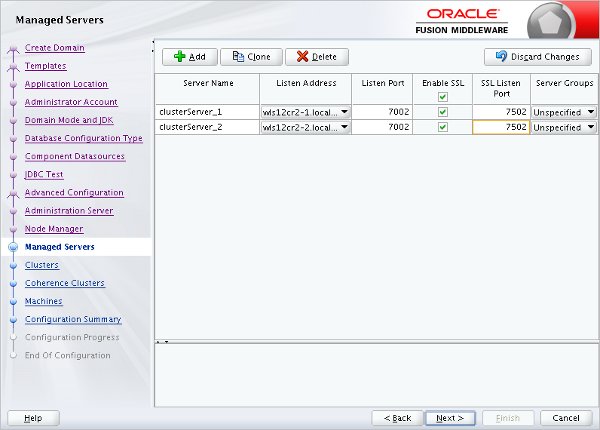
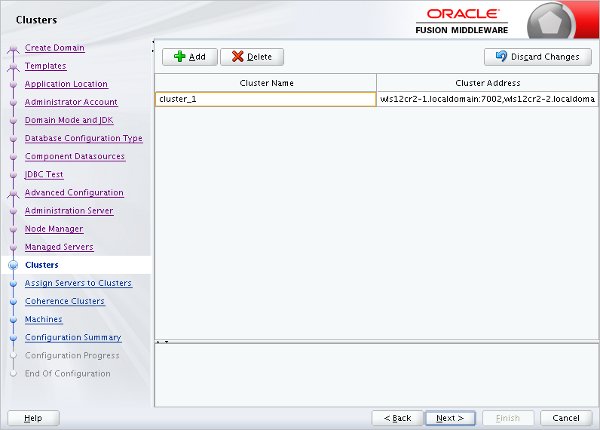
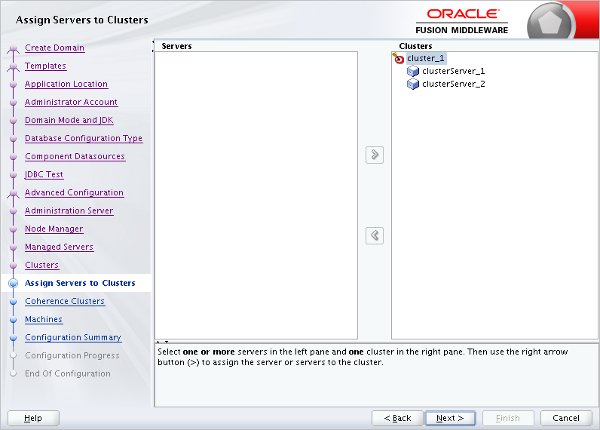
WebLogic Server 12cR1 (12.1.2 and 12.1.3) : Clustered Domains

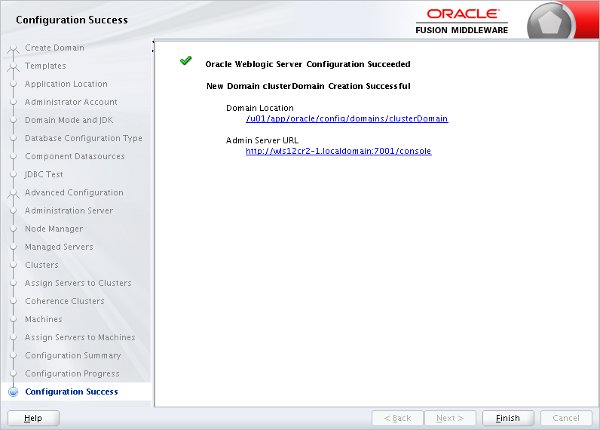
Create clustered domains using Oracle WebLogic Server 12c (12.1.2 and 12.1.3).

oracle 12cconfigurationintermediate
by OracleDba
11 views
1

Create the Clustered Domain

This article describes how to create a two-node clustered domain using Oracle WebLogic 12cR1 (12.1.2 and 12.1.3). Related articles. Make sure both machines have WebLogic 12cR1 (12.1.2 or 12.1.3) installed. An example of these installations can be found here: The example here also includes the ADF Application Developer Runtime. If you plan on building a clustered domain for deployment of ADF applications, you will also need to configure the following before moving on. Once the installation is complete on both machines, come back to this article to create the clustered domain. The details of the cluster being built in this article are as follows. Creation of a clustered domain can be done from the administration console, the command line or the configuration wizard. In my opinion, using the configuration wizard is the quickest way to get the job done. Start the configuration wizard. Accept the "Create a new WebLogic domain" option and enter the domain location, including the domain name at the end of the location. In this case I used "/u01/app/oracle/config/domains/clusterDomain". Click the the "Next" button. Select the product templates the domain requires and click the "Next" button. Depending on the options you pick, a number of additional steps may be included.
Step 1
2

Create the Clustered Domain

Enter the application location, including the domain name in the path, and click the "Next" button.
Step 2
3

Create the Clustered Domain

Enter the administor account credentials and click the "Next" button.
Step 3
4

Create the Clustered Domain

Enter the domain mode and JDK, then click the "Next" button.
Step 4
5

Create the Clustered Domain

Select the "RCU Data" option and enter the database details. Click the "Get RCU Configuration" button.
Step 5
6

Create the Clustered Domain

Once the details are retrieved, click the "Next" button.
Step 6
7

Create the Clustered Domain

Accept the component datasources by clicking the "Next" button.
Step 7
8

Create the Clustered Domain

Once the JDBC tests have completed successfully, click the "Next" button.
Step 8
9

Create the Clustered Domain

Select the advanced configuraton options you require and click the "Next" button. For this example I checked the first three options. Depending on the options you pick, extra steps may be added.
Step 9
10

Create the Clustered Domain

Enter the administration server details and click the "Next" button.
Step 10
11

Create the Clustered Domain

Select the type of node manager you require and enter the credentials. Click the "Next" button.
Step 11
12

Create the Clustered Domain

Add the managed servers for the domain, making sure the listen address is referring to the appropriate machine for each. When you are finished, click the "Next" button.
Step 12
13

Create the Clustered Domain

Add a cluster entry, remember to add the appropriate cluster address. This can be a comma-separated list of "IP/DNS_Name:port" for the managed servers, a DNS name that maps to multiple IP addresses or the local machine if all servers run on one machine. Click the "Next" button.
Step 13
14

Create the Clustered Domain

Associate the managed servers with the cluster and click the "Next" button.
Step 14
15

Create the Clustered Domain

Accept the Coherence Cluster setting by clicking the "Next" button.
Step 15
16

Create the Clustered Domain

Click the "Unix Machine" tab and add the machines used by the cluster. I've used the fully qualified machine names in all cases. Click the "Next" button.
Step 16
17

Create the Clustered Domain

Assign the managed servers to the machines in the cluster and click the "Next" button.
Step 17
18

Create the Clustered Domain

If you are happy with the summary information, click the "Create" button.
Step 18
19

Create the Clustered Domain

Once the configuration is complete click the "Next" button.
Step 19
20

Create the Clustered Domain

Make a note of the Admin Server URL and click the "Finish" button.
Step 20
21

Start Up

If the node manager is not already started on the first server, start it now. Start the new domain on the first machine. This second command will keep hold of the session. That is a good thing right now. Wait for the "RUNNING" state before proceeding. It may seem odd that you are starting the AdminServer in the new domain, then immediately stopping it in the next section (assuming you do not reset the node manager password), but some of the configuration is not written to the file system until the AdminServer is started for the first time, so don't skip this step. Create a boot identity file for the domain. On the first machine, stop the newly created domain. The easiest way to do this is to go into the session that is currently running it and issue "CTRL+C". We will transfer the relevant configuration using the and utilities. On the first machine, pack the domain configuration using the following commands. Remember to amend the environment variable and the parameter to match your domain. Copy the resulting jar file to the second machine. Unpack the configuration on the second machine. Remember to amend the environment variable to match your domain. Restart the domain on the first machine. Wait until it is fully started before continuing. On the second machine, start WLST. Connect to the administration server manager on the first machine, enroll the current machine, disconnect and exit WLST. Check the "$MW_HOME/domain-registry.xml" file contains an entry like the following. If it doesn't, add it manually. Check the "$DOMAIN_HOME/nodemanager/nodemanager.domains" file contains an entry like the following. If it doesn't, add it manually. If the node manager is not already started on this server, start it now. Check the node manager is reachable on each machine. Provided the node manager is up on all servers, you can now start/stop the managed servers on both machines from the command line. The following example shows how you might do this. Provided the administration server is available, you can manage the other managed servers from the console. For more information see: Hope this helps. Regards Tim...
Step 21

Comments (0)

Please to add comments

No comments yet. Be the first to comment!