Windows Server 2022 Failover Cluster using PowerShellfor SQL Server Always On Availability Groups
Windows Server 2022 Failover Cluster using PowerShell for SQL Server Always On Availability Groups
sqlserver clusteringintermediate
by MSSQL
23 views
Windows Server 2022 Failover Cluster using PowerShell for SQL Server Always On Availability Groups
12345678910111213141516
PS C:\Users\Administrator> Install-WindowsFeature -Name Failover-Clustering -IncludeManagementTools
Success Restart Needed Exit Code      Feature Result
------- -------------- ---------      --------------
True    No             Success        {Failover Clustering, Remote Server Admini...


PS C:\Users\Administrator> hostname
NTICBPSQLSGV01
PS C:\Users\Administrator>
PS C:\Users\Administrator> Get-WindowsFeature -Name Failover-Clustering

Display Name                                            Name                       Install State
------------                                            ----                       -------------
[X] Failover Clustering                                 Failover-Clustering            Installed

PS C:\Users\Administrator>12345678910111213141516
PS C:\Users\Administrator> Install-WindowsFeature -Name Failover-Clustering -IncludeManagementTools
Success Restart Needed Exit Code      Feature Result
------- -------------- ---------      --------------
True    No             Success        {Failover Clustering, Remote Server Admini...


PS C:\Users\Administrator> hostname
NTICBPSQLSGV02
PS C:\Users\Administrator> Get-WindowsFeature -Name Failover-Clustering

Display Name                                            Name                       Install State
------------                                            ----                       -------------
[X] Failover Clustering                                 Failover-Clustering            Installed


PS C:\Users\Administrator>123456789101112131415
PS C:\Users\Administrator> Install-WindowsFeature -Name Failover-Clustering -IncludeManagementTools
Success Restart Needed Exit Code      Feature Result
------- -------------- ---------      --------------
True    No             Success        {Failover Clustering, Remote Server Admini...


PS C:\Users\Administrator> hostname
NTICBPSQLSGV03
PS C:\Users\Administrator> Get-WindowsFeature -Name Failover-Clustering

Display Name                                            Name                       Install State
------------                                            ----                       -------------
[X] Failover Clustering                                 Failover-Clustering            Installed

PS C:\Users\Administrator>12345678910111213141516
PS C:\Users\Administrator> Install-WindowsFeature -Name Failover-Clustering -IncludeManagementTools
Success Restart Needed Exit Code      Feature Result
------- -------------- ---------      --------------
True    No             Success        {Failover Clustering, Remote Server Admini...


PS C:\Users\Administrator> hostname
NTICBPSQLSGV04
PS C:\Users\Administrator> Get-WindowsFeature -Name Failover-Clustering

Display Name                                            Name                       Install State
------------                                            ----                       -------------
[X] Failover Clustering                                 Failover-Clustering            Installed


PS C:\Users\Administrator>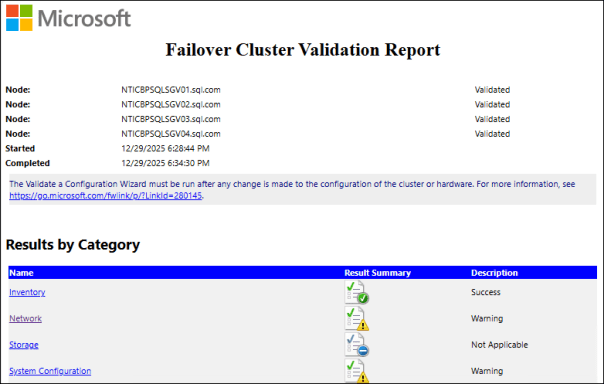
1234567891011121314151617181920212223
On NTICBPSQLSGV01:

PS C:\Users\Administrator> hostname
NTICBPSQLSGV01
PS C:\Users\Administrator> Import-Module FailoverClusters
PS C:\Users\Administrator>

PS C:\Users\Administrator> Test-Cluster -Node NTICBPSQLSGV01,NTICBPSQLSGV02,NTICBPSQLSGV03,NTICBPSQLSGV04
WARNING: System Configuration - Validate Software Update Levels: The test reported some warnings..
WARNING: Network - Validate Network Communication: The test reported some warnings..
WARNING:
Test Result:
HadUnselectedTests, ClusterConditionallyApproved
Testing has completed for the tests you selected. You should review the warnings in the Report.  A cluster solution is
supported by Microsoft only if you run all cluster validation tests, and all tests succeed (with or without warnings).
Test report file path: C:\Users\Administrator\AppData\Local\Temp\2\Validation Report 2025.12.29 At 18.28.44.htm

Mode                 LastWriteTime         Length Name
----                 -------------         ------ ----
-a----        12/29/2025   6:34 PM        1346352 Validation Report 2025.12.29 At 18.28.44.htm


PS C:\Users\Administrator>123456789101112131415161718
New-Cluster `
 -Name NTICBPSQLSGC05 `
 -Node NTICBPSQLSGV01,NTICBPSQLSGV02,NTICBPSQLSGV03,NTICBPSQLSGV04 `
 -StaticAddress 192.168.2.25 `
 -NoStorage

PS C:\Users\Administrator> New-Cluster `
>>  -Name NTICBPSQLSGC05 `
>>  -Node NTICBPSQLSGV01,NTICBPSQLSGV02,NTICBPSQLSGV03,NTICBPSQLSGV04 `
>>  -StaticAddress 192.168.2.25 `
>>  -NoStorage

Name
----
NTICBPSQLSGC05


PS C:\Users\Administrator>12345678
PS C:\Users\Administrator> Get-Cluster

Name
----
NTICBPSQLSGC05


PS C:\Users\Administrator>1234567891011
PS C:\Users\Administrator> Get-ClusterNode

Name           State Type
----           ----- ----
NTICBPSQLSGV01 Up    Node
NTICBPSQLSGV02 Up    Node
NTICBPSQLSGV03 Up    Node
NTICBPSQLSGV04 Up    Node


PS C:\Users\Administrator>123456789
PS C:\Users\Administrator> Get-ClusterResource

Name               State  OwnerGroup    ResourceType
----               -----  ----------    ------------
Cluster IP Address Online Cluster Group IP Address
Cluster Name       Online Cluster Group Network Name


PS C:\Users\Administrator>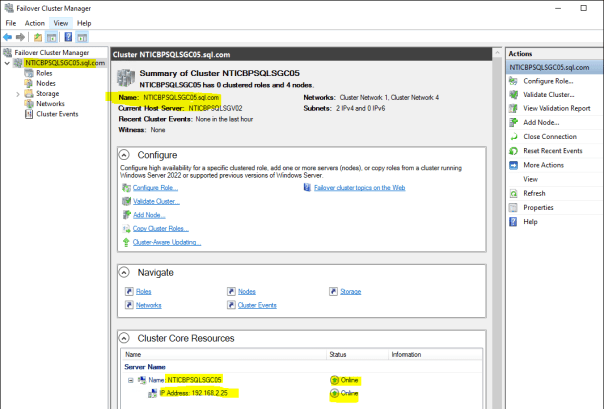
12345678
PS C:\Users\Administrator> Get-ClusterNetwork | Format-Table Name, Address, Role, State

Name              Address                 Role State
----              -------                 ---- -----
Cluster Network 1 192.168.2.0 ClusterAndClient    Up


PS C:\Users\Administrator>
Please to add comments
No comments yet. Be the first to comment!