DBA Hub

📋Steps in this guide1/33

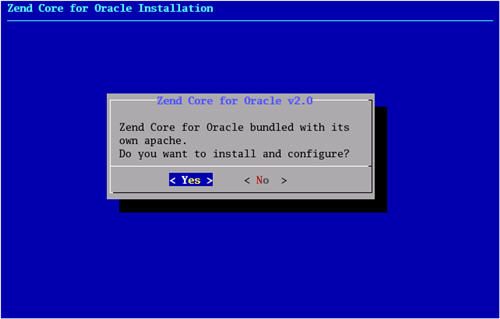
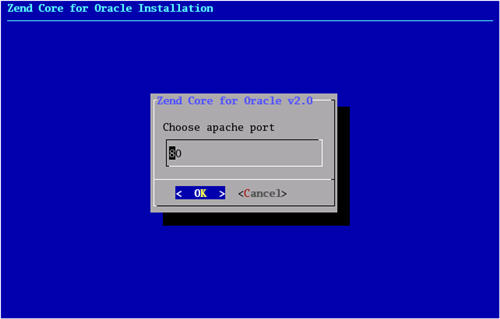
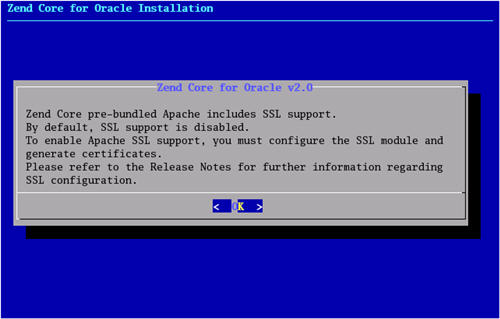
Zend Core for Oracle v2

Get a fully configured Apache + PHP server with full Oracle connectivity from a single installation.

oracle miscconfigurationintermediate
by OracleDba
12 views
1

Zend Core Installation on Linux

Using Zend Core for Oracle, one installation can provide you with a working PHP installation with full Oracle connectivity and an optional Apache server, with no need for extra configuration needed. It doesn't get simpler than that. Download the appropriate Zend Core software for your platform, then follow the installation instructions below to perform a default installation on Linux or Windows XP. - Zend Core Installation on Linux - Zend Core Installation on Windows - Test It This Zend Core installation was performed on a clean installation of Oracle Enterprise Linux 4.5 . Log in as the root users and open a terminal session. Unzip and extract the Zend Core software, then start the installation. Click the "OK" button on the welcome screen. Click the "Next" button at the start of the license agreement screen.
Step 1
2

Zend Core Installation on Linux

Accept the license agreement by clicking the "Yes" button.
Step 2
3

Zend Core Installation on Linux

Accept the default location by clicking the "OK" button.
Step 3
4

Zend Core Installation on Linux

Wait for the Zend Core installation to complete.
Step 4
5

Zend Core Installation on Linux

Enter a password for the Zend Core Web GUI, then click the "OK" button.
Step 5
6

Zend Core Installation on Linux

Re-enter the password and click the "OK" button on the confirmation screen.
Step 6
7

Zend Core Installation on Linux

Click the "No" button on the support screen.
Step 7
8

Zend Core Installation on Linux

Click the "Yes" button to install the bundled Apache server.
Step 8
9

Zend Core Installation on Linux

Wait for the Apache installation to complete.
Step 9
10

Zend Core Installation on Linux

Accept port "80" by clicking the "OK" button.
Step 10
11

Zend Core Installation on Linux

Read the SSL support note, then click the "OK" button.
Step 11
12

Zend Core Installation on Linux

Accept the default installation method by clicking the "OK" button.
Step 12
13

Zend Core Installation on Linux

Read the Apache installation note, then click the "OK" button.
Step 13
14

Zend Core Installation on Linux

Accept the "Oracle OCI DB Drivers" option by clicking the "OK" button.
Step 14
15

Zend Core Installation on Linux

Click the "Next" button on the installation summary screen.
Step 15
16

Zend Core Installation on Linux

Click the "OK" button on the installation completion screen.
Step 16
17

Zend Core Installation on Windows

Unzip the "ZendCoreForOracle-v2.0.3-Windows-x86.zip" zip file, double-click the resulting "ZendCoreForOracle-v2.0.3-Windows-x86.exe" executable, then wait for the install shield to start. Click the "Next" button on the welcome screen.
Step 17
18

Zend Core Installation on Windows

Accept the license agreement, then click the "Next" button.
Step 18
19

Zend Core Installation on Windows

Select the "Complete" setup type, then click the "Next" button.
Step 19
20

Zend Core Installation on Windows

Accept the default location by clicking the "Next" button.
Step 20
21

Zend Core Installation on Windows

Select the "Install bundled Apache 2.2.2" option, then click the "Next" button.
Step 21
22

Zend Core Installation on Windows

Accept port "80" by clicking the "Next" button.
Step 22
23

Zend Core Installation on Windows

Accept the default extension associations by clicking the "Next" button.
Step 23
24

Zend Core Installation on Windows

Enter an administration password, then click the "Next" button.
Step 24
25

Zend Core Installation on Windows

Select the "No" support option, then click the "Next" button.
Step 25
26

Zend Core Installation on Windows

Click the "Install" button on the the read to install screen.
Step 26
27

Zend Core Installation on Windows

Wait for the installation to complete.
Step 27
28

Zend Core Installation on Windows

Towards the end of the installation the "Update Your System" wizard is initiated.
Step 28
29

Zend Core Installation on Windows

Click the "OK" button on the message dialog.
Step 29
30

Zend Core Installation on Windows

Click the "Finish" button on the installation complete screen.
Step 30
31

Test It

Copy the example PHP code from the Web Scripting for Oracle article and save it into a file called "test.php" in one of the following locations. - Linux: "/usr/local/Zend/apache2/htdocs" - Windows: "C:\Program Files\Zend\Apache2\htdocs\" You will need to adjust the database connection details on line 10. When using the Zend Core, you have three ways to identify the database you wish to connect to, all of which are shown below. The first method uses the EZConnect URL to identify the database. The second method, uses a full description, as you would expect to see in the tnsnames.ora file. The third method uses a database alias, which is translated using a tnsnames.ora file. For the third method to work correctly, you must create a tnsnames.ora file in the location specified by the "putenv" function. To match the example code on Linux we must create the directory. Then create a "tnsnames.ora" with the following contents. The third connection method should work correctly now also. Run the test script by requesting the following style URL from a browser. The expect output is displayed in the Web Scripting For Oracle article. During the installation you were prompted for an administrator password. The following URL points you to the administration login page. Enter the password you specified during the installation, the click the triple-arrow image.
Step 31
32

Test It

You are then presented with the Zend Core Administration page.
Step 32
33

Test It

For more information see: - Web Scripting For Oracle - Zend Core Downloads - Zend Technologies Limited Hope this helps. Regards Tim...
Step 33

Comments (0)

Please to add comments

No comments yet. Be the first to comment!